Blog: Agronomy & Extension

What exactly are corn, sunflowers and flax dealing with in this standing water and saturated soils?

MCA_AoA Headers SPECIAL CROPS

By Morgan Cott, Agronomy Extension Specialist – Special Crops, Manitoba Crop Alliance

The crops we grow and work with in Manitoba do not generally do well in extended periods of flooding or saturated soils. Roots and growing points need oxygen to develop, so plant growth is delayed in these conditions. Disease development is also escalated in wet, hot, humid conditions, so that is another impending threat down the road.

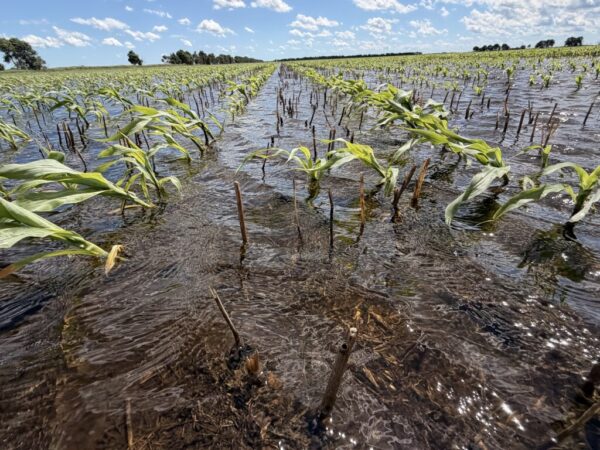
Timing has not been ideal for corn. If you have puddling or any degree of flooding or standing water, corn at V5 or smaller is at vulnerable staging for survival. The growing point remains below ground until V6 and I think most corn crops were moving into the V6 at the time of the June 23 heavy rainfalls. It can be very stressful for a crop to have excessive moisture arrive as the growing point emerges from underground. No matter where the growing point is in the plant, if it is below the waterline, conditions become anaerobic and it cannot “breathe.” While photosynthesis can still be occurring in parts of the plant above the waterline, root growth is restricted below the waterline and all nutrient and water intake is hindered.

At this point in the season, I want any standing water to recede quickly and I also want the air temperature to stay mild during that period so there is no rapid growth or additional stress. Already, a week after the heavy rains, there is very visible rapid growth in corn fields across southern Manitoba.

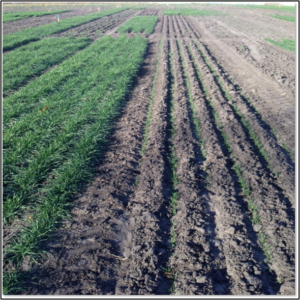
Partially flooded corn field. Photo by Eric Tyschinski, MCA summer student.

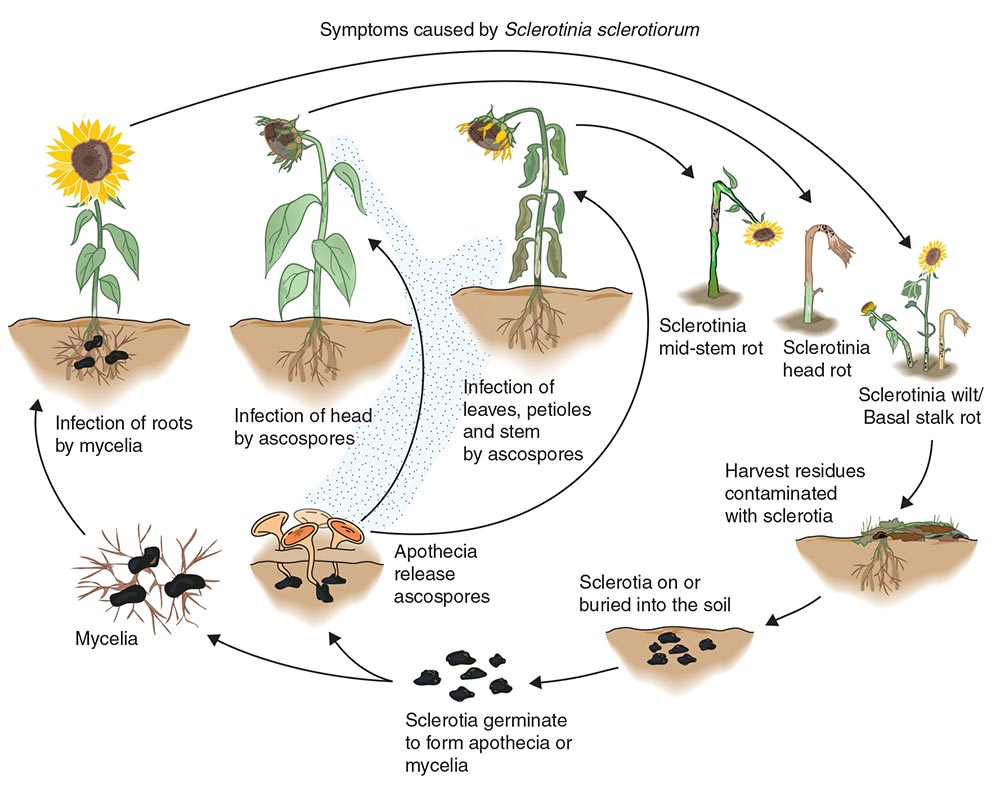
Sunflowers are equally stressed in anaerobic conditions. Even though their water use is very high, if the plant cannot breathe, it cannot grow. In these times of excess moisture, we don’t want the crop to be in standing water for longer than three days, and cloudy, mild temperatures are best to keep other stresses to a minimum. Unfortunately, sclerotinia development is a significant threat in these conditions, and as the fields dry out, humidity will be high and conditions will be favourable to development, so basal and stalk infections could become severe this year. Keep an eye on stressed sunflower fields to ensure new growth is still coming and plants are still photosynthesizing. 

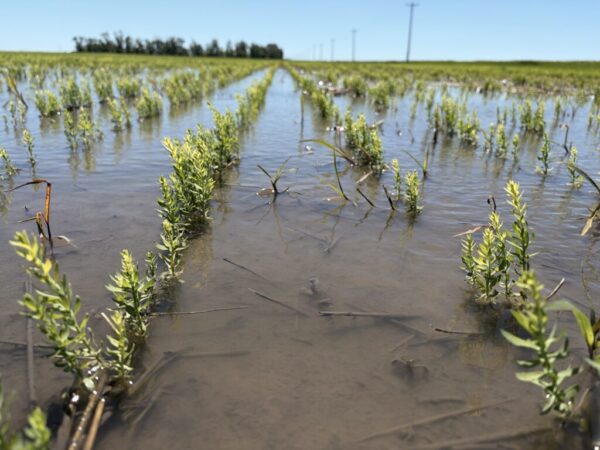
Effects of excess moisture in flax are exactly what we would guess: it has a low tolerance to severe stresses and will not survive long. The estimate for flax in standing water is about three days before the crop really starts to struggle and yield will be affected. Fortunately, stem root diseases are only a minor issue in flax crops and the wet soil conditions won’t affect this crop as much as it would others with regards to disease intolerance.

With all crops, check for new growth regularly to determine how efficiently the crop is still working and developing. Dig up a few plants to assess root growth. In saturated soils, roots don’t need to grow downward to find moisture, so the benefits of a strong root system later in the season might be diminished. Root health may suffer, which will be identifiable by the colour of the root. These are all good assessments to continue until the soil water subsides, the field starts to dry out and the crop can grow as intended.

Partially flooded flax field. Photo by Eric Tyschinski, MCA summer student.

I’ve been hearing a lot about spray drones; can I spray pesticides by drone on my farm now?

MCA_AoA Headers WHOLE FARM

By Ashley Ammeter, Whole Farm Specialist, Manitoba Crop Alliance

This topic has definitely been getting a lot of attention lately!

The short answer is yes, in some cases, agricultural pesticides can now be applied by drone in Canada. However, there are important rules and regulations to follow, drone spraying is not without risk and there are some unique considerations that are important to understand.

What changed?

On June 10, 2026, the Pesticides Regulatory Directorate (PRD) of Health Canada (formerly the Pesticide Management Regulatory Agency or PMRA) issued a Letter of No Objection, an interim measure which allowed the application of pesticides by drone in some circumstances, and was intended to apply until a final policy decision could be released.

On June 30, 2026, the PRD of Health Canada finalized their policy, allowing application of pesticides by drone for any product already registered for conventional aerial application. The full details of the new policy are available here.

Licenses and certification

If you’re considering drone spraying, there are several licenses and certifications you need to be aware of.

In Canada, drones weighing more than 250 g (including spray drones) must be registered, and the operator must have a drone pilot certificate from Transport Canada.

In Manitoba, commercial pesticide applicators must have a pesticide applicator license, but farmers applying pesticides on their own farms are exempt from licensing.

Always read and follow the product label

It is important to remember that pesticide labels are legal documents. Regardless of how you’re applying the pesticide, always read the label carefully.

If the product label allows aerial application to the crop you wish to spray, you may be eligible to spray by drone. You must follow all label directions for aerial application, including spray volume, application rate, droplet size, spray buffer zones or any other instructions. The only exception is that statements on nozzle distribution (ex. “Nozzle distribution along the spray boom length MUST NOT exceed 65% of the wing- or rotor-span”) are not applicable to drones.

If the label states “DO NOT apply by air” or “DO NOT apply by Remotely Piloted Aircraft Systems (RPAS)”, you may not use a drone to apply that pesticide. If the label requires a closed cab for ground application, you cannot apply that product by drone unless a similar “closed cab” system is used for the pilot.

In addition, the person who mixes and loads the pesticide must be different from the drone pilot. Mixers and loaders must wear the personal protective equipment (PPE) required for mixer/loaders by the pesticide label, and the drone pilot, visual observers, or anyone handling the drone must wear the PPE required for ground application. 

How well does drone spraying work?

This is where things get complicated. Drone spraying can be a useful and effective application method, but achieving consistent efficacy requires an understanding of some of the factors that make drone applications unique.

Sprayers 101, a non-profit website providing information on agricultural spraying, has several excellent articles focused on pesticide application using drones. I highly recommend their resources! Their article Safe and Effective Pesticide Application using Drones provides an excellent overview of factors to consider before jumping into drone spraying.  

One of the biggest challenges is determining a drone’s effective swath width. A drone’s swath width can vary significantly depending on the drone design, the height and speed of travel, spray droplet size, and weather conditions. The result is that the swath width that gives you adequate pesticide coverage and efficacy may differ from the values reported by manufacturers or determined by spray droplet deposition testing. Calibrating your equipment and measuring swath width under your conditions and spray settings is critical to preventing uneven pesticide coverage.  

Drift is another important consideration. Like with other aerial application methods, drone sprayers can be particularly susceptible to drift if conditions are not suitable. In addition, most spray drones use rotary atomizers, which differ from conventional nozzles. Most conventional nozzles follow an international standard, producing known droplet sizes at given flow rates and pressures. Rotary atomizers, however, are not standardized and may produce larger or smaller droplets than an operator expects. Understanding your equipment and application settings is critical to minimizing the risk of drift.

The bottom line

If you’re thinking of using a spray drone, whether you plan to operate it yourself or hire a custom applicator, make sure you understand the regulatory requirements and application best management practices. Like any spray operation, success with drone spraying depends on taking the time to do it right.  

For anyone interested in learning more, Sprayers 101 has many excellent resources. The articles linked below are a great starting point to learn about pesticide application with drones:

I think I have hard water, should I be adding AMS to my herbicide spray mix?

MCA_AoA Headers WHOLE FARM

By Ashley Ammeter, Whole Farm Specialist, Manitoba Crop Alliance

Water quality can play a significant role in pesticide performance, but it’s a consideration that often flies under our radar until a herbicide application doesn’t work as well as we hoped. If you suspect hard water, adding ammonium sulphate (AMS) could the right call, but first it’s important to know what’s actually in your water. 

Start by testing your water

The first step in managing potential spray water issues is to test your water. While it’s generally good practice to test your water quality, it’s even more important if you suspect that poor water quality is affecting the performance of your herbicides. Agricultural spray water analyses are offered by many accredited agricultural laboratories, such as AGVISE Laboratories, A&L Canada Laboratories, Central Testing Laboratory and Horizon Lab.

Once you have a water quality test, Sprayers 101 has a helpful article on how to make sense of your water quality test results.

Why is hard water a problem?

Hard water contains high levels of positively charged minerals such as calcium (Ca2+), magnesium (Mg2+) and others. These minerals bind to herbicide molecules, preventing them from being absorbed by the plant and reducing efficacy.

Glyphosate (e.g., Roundup) is commonly associated with hard water antagonism, but hard water can reduce the efficacy of all weak acid herbicides (found in Groups 1, 2, 4, 6, 9, 10, 14, 19 and 27).

How much hardness is too much depends on the herbicide, rate and water volume you’re using. For glyphosate, Bayer suggests a hardness limit of up to 700 ppm, when using higher rates or lower water volumes.

Should you add AMS?

If you have hard water but don’t have access to an alternate water source, adding AMS is an effective strategy.

When added to spray water before your herbicide, the negatively charged sulphate ions in AMS tie up the hard water cations before they can antagonize the herbicide. To calculate how much AMS to use, Sprayers 101 has a helpful calculator, but many agriculture labs that offer spray water tests will include AMS recommendations in your test results, and herbicide labels or the Manitoba Agriculture Guide to Field Crop Protection often include water quality recommendations.

In some cases, reducing water volumes and/or increasing your herbicide rate can help counteract the effects of hard water, but always make sure to stay within label guidelines. 

Other water quality issues to be aware of

Along with hardness, there are a few other water quality factors to keep on your radar:

  • Dirty water (turbidity): Particles of soil and organic matter can bind herbicides and reduce performance. Clean water is particularly important for herbicides that are known to strongly bind to soil, such as glyphosate and diquat (e.g., Reglone).
  • Bicarbonates: Bicarbonate ions can inhibit herbicides, particularly the Group 1 “dims,” including clethodim (e.g., Select, Centurion) and tralkoxydim (e.g., Achieve) and the Group 4 herbicides MCPA amine and 2,4-D amine.
  • pH (acidity or alkalinity): The pH of your spray water can impact pesticide solubility and breakdown. Unless recommended on the product label, it is generally not advised to adjust the pH of your spray solution. For those interested in learning more, Sprayers 101 has a helpful article.

My last piece of advice: always read and follow the directions on your pesticide label. While they can be long and unwieldy, the pesticide label includes key details on how to use your herbicide safely and effectively.

Learn more

Does applying a fungicide at herbicide timing to control cereal leaf spot diseases in wheat and barley provide a yield boost?

MCA_AoA Headers CEREALS

By Andrew Hector, Agronomy Extension Specialist – Cereal Crops, Manitoba Crop Alliance

This question comes up regularly which makes sense. Early season outbreaks of fungal leaf spot diseases like Tan Spot do occur in Manitoba, such as in 2024. To answer this question, we need to dig into the research.

There have been a few studies done in Western Canada over the last 15 years investigating this very practice in both wheat and barley.

  1. The impact of fungicide and herbicide timing on foliar disease severity, and barley productivity and quality
  2. Evaluation of disease, yield and economics associated with fungicide timing in Canadian Western Red Spring wheat

In both these studies fungicide application timings were evaluated on their impact on leaf spot disease severity, overall crop yield, and economic returns of the practice. In both studies, it was found that a foliar fungicide application at herbicide timing (2-3 leaf) did not lower upper canopy disease incidence and severity compared to the check (no treatment or herbicide only).

For barley, the western Canadian study found that the half rate foliar fungicide treatment at herbicide timing provided only a small increase in crop yield compared to the herbicide only check. The study examining spring wheat’s response to early season fungicide found that fungicide application at herbicide did not significantly improve crop yield compared to the untreated check. Across both studies, researchers concluded that fungicide timing for leaf diseases should focus on protecting the upper canopy, particularly the leaves that contribute most to yield.

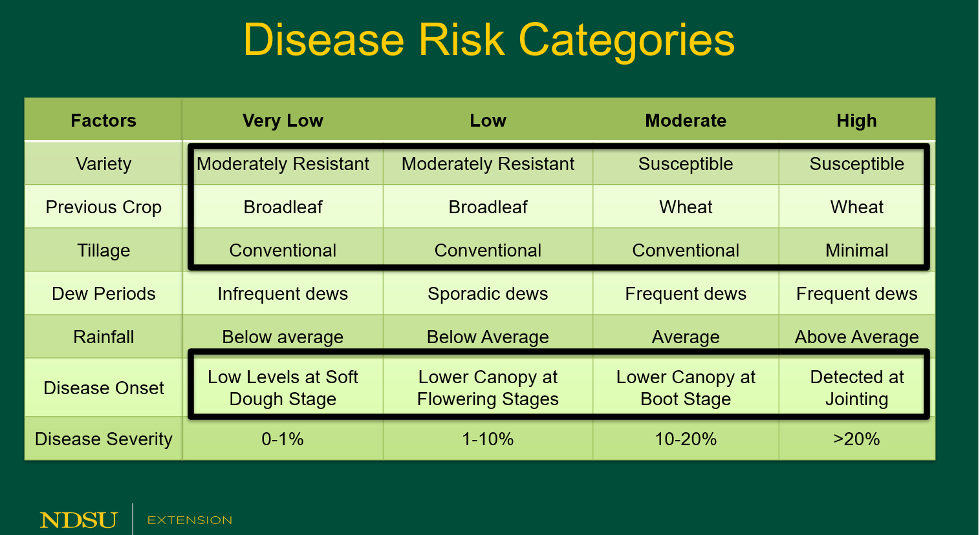
There has also been some research on this topic out of North Dakota. Andrew Friskop from North Dakota State University recently compiled replicated foliar fungicide timing trial data from 2008-2024. He evaluated the yield response based on “disease risk” scenarios determined by previous crop, variety resistance, tillage, environmental conditions and disease onset.

Figure 1. NDSU disease risk categories for development of residue-borne foliar diseases.

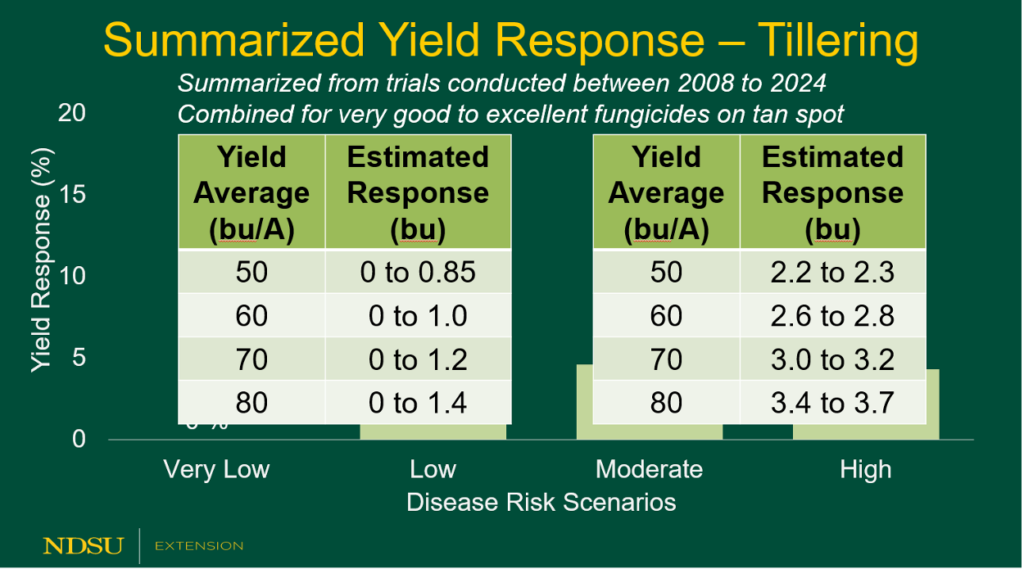
His finding suggests that under moderate and high-risk scenarios, (where wheat was grown on wheat stubble, a susceptible variety was planted and the disease [tan spot] was established early and firmly in the crop), a fungicide application at tillering could provide a small benefit of 2.2 – 3.7 bu/ac. In basically all other production scenarios he found that a foliar fungicide application at tillering would provide very little yield response.

Figure 2. Summary of yield response by disease risk level for early season fungicide application.

What is the difference between GDD, CHU and RM? Why and when are they each important?

MCA_AoA Headers SPECIAL CROPS

By Morgan Cott, Agronomy Extension Specialist – Special Crops, Manitoba Crop Alliance

This is such a great question and I understand the reasons for asking. First of all, I think it is understood that GDD & CHU both basically measure how efficiently a day’s heat will benefit a growing or developing crop. One main difference between the two measurements is that CHU does account for extremely high temperatures (>30oC) that negatively affect crop development. CHU also looks at both the nighttime low temperatures (4.4oC as the base) and daytime temperatures between only 10oC (base) and 30oC (optimum ceiling).

GDD has historically been used to help estimate certain agronomic events like insect emergence, weed emergence, frost-free days and specific crop staging. My understanding is that CHU is used more for maturity than for the ability to accurately predict these different timelines throughout the season. This might be why certain seed companies use CHU and RM for maturity ranking and GDD for staging references.

Pride Seeds is an example of this, because they break down maturity with both CHU and RM, in addition to two key reproductive stages in GDD accumulation.

When calculating GDD or CHU, you will start from the day after corn was planted. It takes from 100 – 120 GDD for corn to emerge following planting, which is in ideal conditions, including soil moisture and soil temperature, which were variable this spring (and every spring). Start your calculations from day 1 until the day of emergence and see if that fits the above. Now that corn has emerged and is actively growing in your current conditions, continue to monitor accumulating GDD with the following formula. This will give you a head start on expectations during the growing season. When to expect pollination, for example. Note that this GDD accumulation in relation to corn staging is all in relation to each individual hybrid. A shorter season hybrid will need fewer GDD or CHU to reach black layer than a longer season hybrid, of course.

GDD formula
CHU formula

I’m switching my wheat variety; do I need to change my seeding rate?

The short answer is yes; you will most likely need to change your seeding rate, but this is not just because you are planting a different wheat variety. Rather, seeding rates should be adjusted annually to reflect seed source characteristics (germination, thousand kernel weight [TKW]) and the environment the seed is being planted into, to ensure you can achieve your target plant population.  

Let’s dig into why this is. For spring wheat, provincial target plant population recommendations are between 23-28 pl/ft2, with many producers targeting the upper end of this recommendation. Achieving your target plant stands sets your crops up for success, as crop uniformity is improved, weed pressure is combatted and resources are optimized.  Seeding rates should be calculated to achieve your target plant stand, which means accounting for germination percentage, expected mortality and, importantly, your TKW. TKW changes year-to-year and from variety to variety.

Let’s consider an example to illustrate the relationship between kernel weight and seeding rate. For this example, let’s call our two varieties variety one and variety two. When comparing these two varieties we need to consider:

  • TKW: The weight (g) of 1,000 kernels of wheat from a specific seed lot.
  • Germination: If using bin-run seed, a seed test is needed to determine germination percentage. If purchasing certified seed, then your seed provider will be able to provide you with this information.
  • Expected mortality: The percent of seed/seedlings that won’t produce a plant due to unfavourable conditions or biotic stress.
  • Expected seed survival: Germination – Expected Mortality.

Example #1:

Variety

TKW

Germ (%)

Expected mortality (%)

Expected seed survival

Target plant density (pl/ft2)

1

42

97

6

91

27

2

33

97

6

91

27

Using the formula provided by Manitoba Agriculture (below) we can see the difference in seeding rates and therefore seed costs.

Seeding by plant population formula:

Seeding rate (lb/ac) = Target Plant Population (pl/ft2) x TKW (g)

                                              Expected Seed Survival (decimal) x 10

 Variety 1:

Seeding rate (lb/ac) = Target Plant Population (pl/ft2) x TKW (g)

                                              Expected Seed Survival (decimal) x 10                                          

                                                         = 27 (pl/ft2) x 42 (g)

                                                                     0.91 x 10

                                                         = 125 lb/ac

Variety 2:

Seeding rate (lb/ac) = Target Plant Population (pl/ft2) x TKW (g)

                                              Expected Seed Survival (decimal)

                                                         = 27 (pl/ft2) x 34 (g)

                                                                     0.91 x 10

                                                          = 101 lb/ac

This example shows that there is roughly a 24 lb/ac difference between the two seeding rates to achieve the same desired plant population. If you seeded variety 2 at the same rate as variety 1, then you would have over seeded, which could result in a thicker canopy, bringing challenges like an increased lodging and disease development risk.

Also, over seeding would have cost you money. Using a standard seed cost of 0.27 ¢/lb of seed (Manitoba Cost of Production Guide), then variety 2 at your normal rate would cost an additional $6.5/ac of seed that is probably not needed to reach your desired plant population.

Now, if the weather, disease, insects and equipment co-operate, you’ll achieve your target plant population. But it’s always best practice to do plant counts to get an understanding of the crop establishment and uniformity of emergence. More information on plant stand counts can be found here: Plant Stand Counts in Spring Cereals | Manitoba Crop Alliance.

Should I be looking at biologicals to offset high fertilizer costs?

How much 10-34-0 can be applied with my corn seed?

Top